Using Wise2Sync
Wise2Sync products catalog management tools described in detail. This is after you have imported your products from product feeds / suppliers.
- Data Mapping
- Category Mapping
- Attribute Mapping
- Vendors / Manufacturers auto-mapping
- Category Import / Export
- Category Set
- Setting category priorities
- Product repricing
- Rules Builder
- Export profiles
- Export Profiles List
- Creating a New Export Profile
- General Settings
- Product Filter
- Export Data Template
- Uploading products to FTP
- Export results - product log files
- XSD Schema validation for XML type export profiles
- How Automated & Manual Exports Work
- Dynamic Attributes
- Product Export Checker
- Product Data Preview
- Re-index suppliers
Data Mapping
Everything about attributes mapping: categories, manufacturers and product data.
Category Mapping
Same as with product brands, category mapping is needed to standardize your products catalogue. This is used to make sure products from different data feeds fall into the same category tree.
We created a short video with examples - Wise2Sync - Category Mapping.
Manual category mapping
Step 1. Create your categories list
Before you start mapping categories, you need to create your own category list. If you are starting fresh, we recommend creating a categories list first in a spreadsheet. Give categories some meaningful names, like:
- Accessories / Mouses
- Accessories / Keyboards
- Computers / Laptops
- Computers / Desktops
- ...
Once you know your categories tree, navigate to Data mapping → Category mapper → My categories and click "Add category".
A pop-up will appear, where you can enter two values:
- ID - identification number of the category. Can be any unique number or text. This will be a unique identifier for a category. You will not be able to change this later.
- Label - enter the name of the category. You will be able to change this later also.
Click "Create" and your new category is saved.
If you have a list of categories from your existing store, you can use Auto category mapping feature and import the filled-in CSV.
Step 2. Map categories
- Choose a data source (supplier) tab
- Find a category you want to map
- Click on Edit icon in the corresponding row and a pop-up will open:

Use the Alias field to find your created category in Step 1.
Some product feeds or suppliers have very extensive categories of trees. Sometimes it can reach 1000 and more categories per supplier/data feed. You can use a bulk attribute mapper to speed up the process:
- Use the search field to narrow the categories list
- Select desired categories
- Choose the "Edit" action and click "Submit".
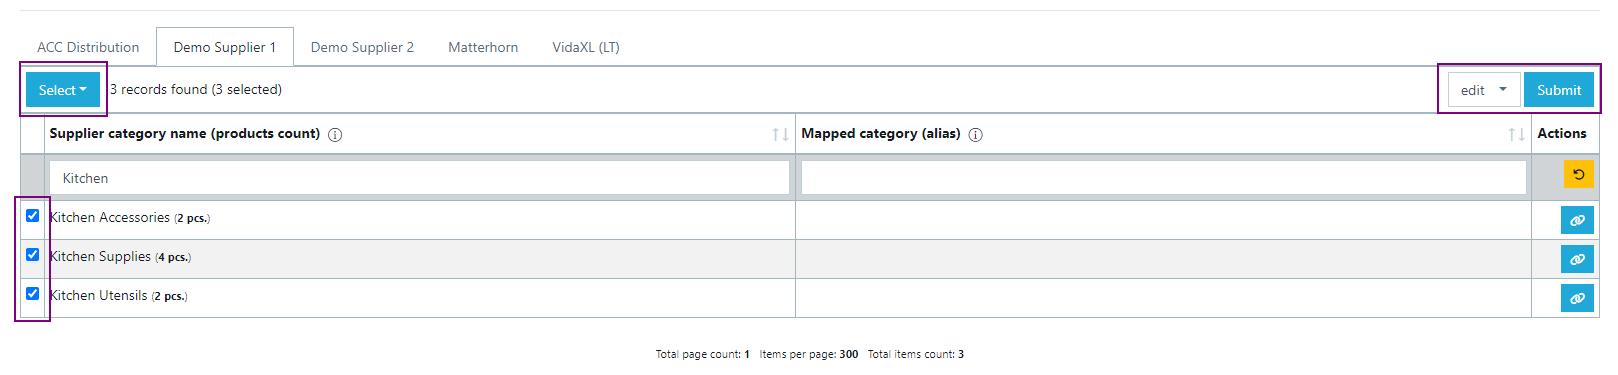
All the selected categories will be mapped at once.
You can see how many products each supplier category has just by checking out the number in brackets near each category name.
Auto category mapping
Step 1. Download CSV file with supplier categories list.
The fast way to map all categories is to import them. Before you start importing categories, you need to download the supplier category list from Wise2Sync. Navigate to Data mapping → Category mapper → Supplier categories. Here you will see a list of all categories that Wise2Sync has found in suppliers feeds. All categories are also split by data sources. In CSV file with categories, you will see column supplier name so you will be able to map all categories from all data sources at once.
- Press Import/Export icon on the top right corner
- Click on Export and a pop-up will open
- Choose default if you have not created any category sets yet and press export:


Step 2. Map your categories with supplier categories in CSV file.
Columns Supplier name and Supplier category must stay the same. Make changes only in Client category code and Client category label columns. If you use Shopify or Woocommerce in column Client category code put category ID. Check Woocommerce and Shopify category mapping. For other platforms, you can use the same category name in both columns.

Step 3. Import your categories.
After you are done with your categories mapping in CSV file you can import it. Navigate to Data mapping → Category mapper → Supplier categories.
- Press Import/Export icon on the top right corner
- Click on Import and a pop-up will open
- Choose default if you have not created any category sets yet and press Upload CSV file:
- Select file you want to import (be sure you choose the right file because after import you will not be able to redo changes) and press Import:

You will see if the file was uploaded successfully and categories mapped as in CSV file.

After you are done mapping you will be able to use your categories for product filtering, price margins etc.
Attribute Mapping
By default, Wise2Sync maps main product information like brand, manufacturer, price, stock level etc. However, additional product information like delivery terms, weight, dimensions etc. can be useful in your export as well. In this article, we will explain how to map these attributes so this data can be used in export profiles.
Step 1. Create a desired attributes list
Navigate to Data mapping → Attribute mapper → My attributes. Here you will see a list of already mapped attributes. Click "Add attribute" and a pop-up will open:
- Attribute code - unique identifier (ID, code, or any other value, that can be used for import
in your sales platform). You can make this the same as Label. - Label - usually a text value, the name of the Attribute you will see in export profiles
- Type - choose "Text" for text type values (for e.g. "3-5 days", "Coming soon"), or "Number" for numeric values (for e.g. 9.000)

After you click "Create" a new attribute will be saved. Repeat this step for all desired attributes.
Step 2. Map attributes
Navigate to Data mapping → Attribute mapper → Supplier attributes where you will see all possible product attributes from your suppliers / data feeds. Column alias shows the connection between supplier attributes and your attributes. Notice the price, stock etc. are already mapped.
Use a search field to find the desired attribute and click the Edit icon in the corresponding row. A pop-up will open. Use "Alias" field to find an attribute you created in Step 1.
Another way of mapping attributes is to do it straight in Product Preview. Navigate to Product Preview and press the Inspect Product button on the right. A window with all the attributes that the product has will open.
Do not forget to follow Step 1 of this article to create your attributes first.
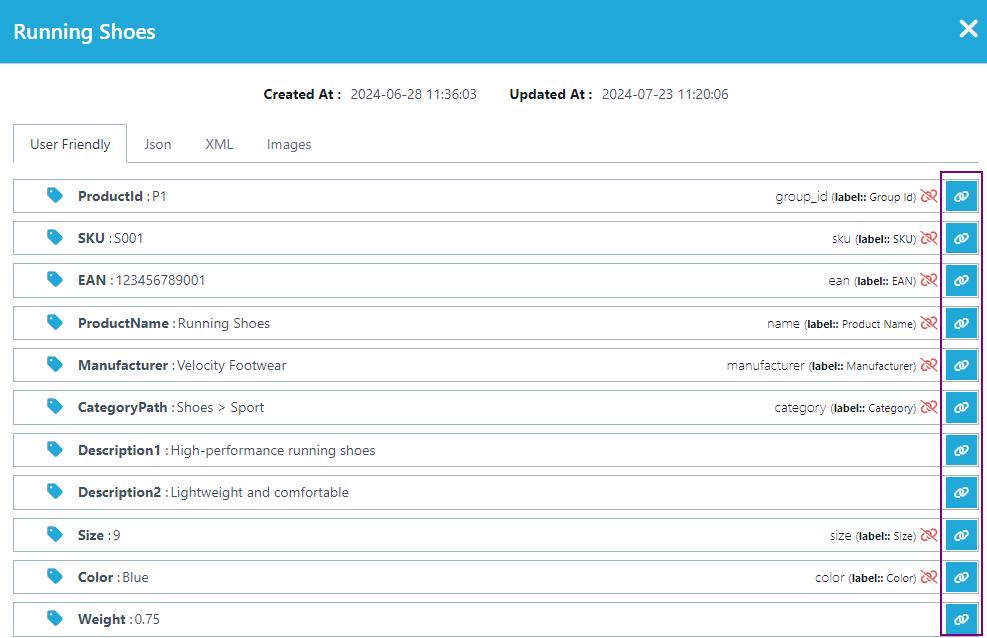
On the right you can see attributes mapping buttons and already mapped attributes. You can map desired information or unmap what you do not need.
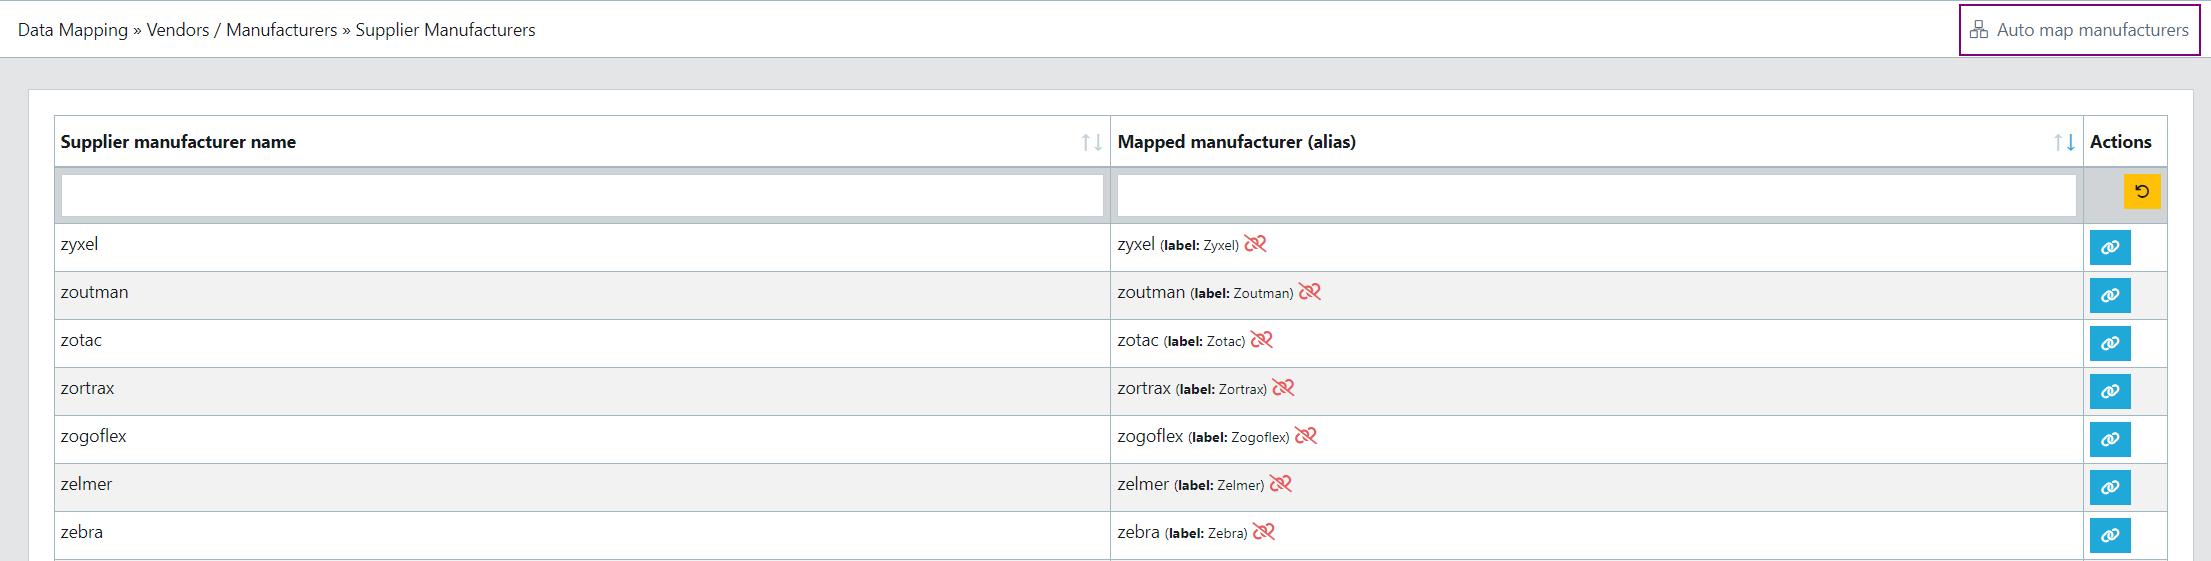
Vendors / Manufacturers auto-mapping
This feature will speed up the Manufacturer mapping procedure. It would collect all available manufacturers / brands from your suppliers and will create related records in the Wise2Sync app.
Go to Wise2Sync → open “Supplier Manufacturers” → click on “Auto map manufacturers” button in the top right corner.
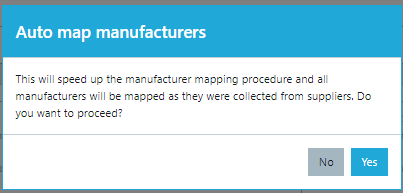
The message will pop up prompting you to click “Yes” option. Once you click on "Yes” option all your manufacturers will be collected and mapped.
You can adjust mapping manually by unmapping unnecessary brands or mapping missing ones.
In the tab "My Manufacturers" you can see that all values were created automatically, you do not need to create them manually. However, you can edit Labels if needed.
After you are done with your mapping, you can use manufacturer attributes for pricing rules, product filtering, etc.
Category Import / Export
Here we will show you how to import your own categories. If you have a list of categories from your existing store, you can import them using CSV file.
Step 1. Download CSV file with supplier categories list.
Before you start importing categories, you need to download the supplier category list from Wise2Sync. Navigate to Data mapping → Category mapper → Supplier categories. Here you will see a list of all categories that Wise2Sync has found in suppliers feeds. All categories are also split by data sources. In CSV file with categories, you will see column supplier name so you will be able to map all categories from all data sources at once.
- Press Import/Export icon on the top right corner
- Click on Export and a pop-up will open
- Choose default if you have not created any category sets yet and press export:
Step 2. Map your categories with supplier categories in CSV file.
Columns Supplier name and Supplier category must stay the same. Make changes only in Client category code and Client category label columns. If you use Shopify or Woocommerce in column Client category code put category ID. Check Woocommerce and Shopify category mapping. For other platforms, you can use the same category name in both columns.
Step 3. Import your categories.
After you are done with your categories mapping in CSV file you can import it. Navigate to Data mapping → Category mapper → Supplier categories.
- Press Import/Export icon on the top right corner
- Click on Import and a pop-up will open
- Choose default if you have not created any category sets yet and press Upload CSV file:
- Select file you want to import (be sure you choose the right file because after import you will not be able to redo changes) and press Import:
You will see if the file was uploaded successfully and categories mapped as in CSV file.
After you are done this you will be able to use your categories for product filtering, price margins etc.
Category Set
Category sets are useful to use when there is more than one export profile used for different webshops.
Once the categories are created and mapped as per steps in this article Category Mapping. For the new export files that go to a different website, the categories set need to be created:
Go to the Wise2Sync dashboard and choose the "Category Set" option:

In the "Category Set" page click the "add category set" option, on the right-hand side top corner. The window will pop up prompting you to create the "Category Set".

Add the ID and Label which is the name of the set and click create.
Next, go to "Supplier Categories" and select the Category Set that you just created.

This will open the supplier categorie's page that are not mapped. Map them with the your categories that are created.
Once this done, you can use your new category set in the export file in the preference tab:
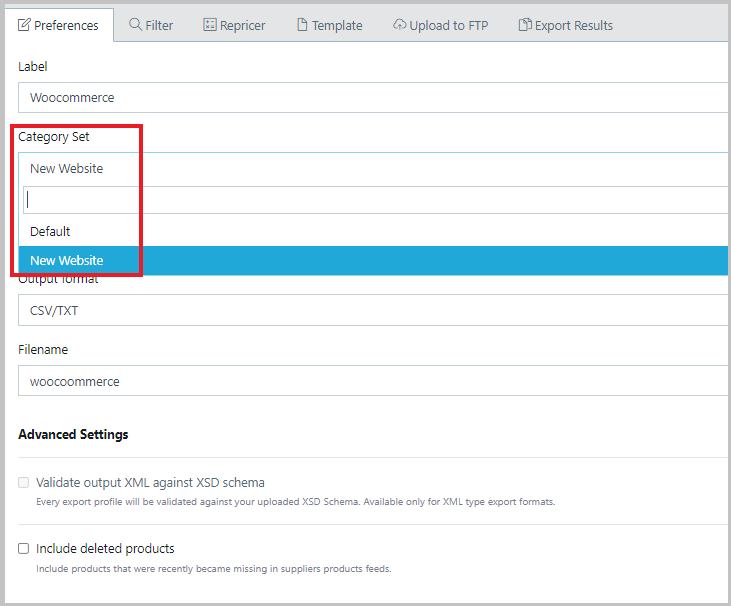
Some of your categories might have ID number which is already in use, especially in Woocommerce platform. Ask you developer to "incriment the category ID number" in the Woocomerce admin panel.
Setting category priorities
In some cases, one product can belong to a few categories. Here we will explain how to prioritize the categories in Wise2Sync.
One product belongs to a few categories
Some suppliers add one product to a few categories, for example, your product is in the "Sell Out" and "PC and servers components" categories.

For instance, you want to prioritize the "Sale Out" category.
Go to → Categories→My Categories→edit button.

In the priority field for the higher category add the highest number, let's say 100. That way this category in the export file will be exported first, followed by the next category.

If you are planning to prioritize more categories in the future make sure you leave gaps in between the numbers, so you could organize the priorities easily.
Product repricing
See how to add product price markup or apply discount based on various conditions.
How repricing works
In this article we will describe how product price adjustments work in Wise2Sync app.
We also prepared a short video with examples - Wise2Sync - Repricing Rules.
Wise2Sync can adjust product prices based on rules and conditions. This is useful when you want to change product prices in your export integrations.
- Repricer rules are connected to the Export profiles. This means you can have different price adjustments based on your integration.
- Multiple rules can be applied to the product. This is based on Priority value: rules with the smallest priority will be applied first.
- Conditions are used to determine whether the price adjustment formula needs to be applied.
- Export Profiles - choose which of your export profile (s) to apply the rule
- Rule Label - give this rule a name you want, later it will be easier to differentiate rules
- Conditions - if all the conditions are met, then price adjustment formula will be applied
- Formula - how to modify the price. Read this article how to use Formula field: using product price adjustment formulas.
- Priority - Wise2Sync applies rules based on priority (rules with the smallest priority are applied first)
- Status - Active / Inactive

Example above means: if all of the conditions are met, add 10% to product base price. You can have multiple rules with different conditions and price adjustments:

Once you are done, you can always check what the exported price is. Read this article how to debut product prices.
We advise to make a price adjustment strategy first, so you make sure you add some kind of markup to all products.
Using price adjustment formulas
Repricer rules are usefull when you want to add price mark-up or make discount. Below we will give you some advises on how you can make adjustments to product price.
Pricing strategy
Before you start, make sure you know weather your suppliers provide prices incl. / excl. VAT. Also consider your pricing strategy - how do you want to add margins: based on supplier, starting price, category, manufacturer or just global fix. If you have doubts, contact our support and we will be happy to assist you.
Base Price
Product price from supplier is assigned to a variable {attr:price}. Wise2Sync allows setting up of multiple pricing rules. This means, that for each pricing rule, a base price can already have added margin.
Operators
Wise2Sync pricing formula supports most common mathematical operators:
+plus (addition)-minus (subtraction)/forward slash (division)*asterisk (multiplication)
Usage is intuitive. Lets take a simple math equation:
({attr:price} + 10) * 1.5Lets say your product price from supplier is 15.39, then the above formula output would be:
(15.39 + 10) * 1.5 = 38.09Available functions
There are also few useful functions, that could make adjustment of prices more flexible:
ceil - returns the next highest integer value by rounding up valuefloor - returns the next lowest integer value (as float) by rounding downround - rounds the value to decimal point
These functions take price variable or any number as a parameter. Lets take a few examples:
ceil({attr:price})
floor({attr:price})
round({attr:price})
round({attr:price} * 1.4) + 10
ceil(({attr:price} + 3) * 1.2) - 0.01
If product starting price was 15.38, then above formulas would output:
ceil(15.38) = 16.00
floor(15.38) = 15.00
round(15.38) = 15.00
round(15.38 * 1.4) + 10 = round(21.532) + 10 = 22.00 + 10 = 32.00
ceil((15.38 + 3) * 1.2) - 0.01 = ceil(22.056) - 0.01 = 23.00 - 0.01 = 22.99
MIN and MAX price comparison
In case you want to fix the minimum or maximum price of the product, you can use:
min(... , ...) returns minimum (smallest) value out of twomax(... , ...) returns maximum (highest) value out of two
For example:
min({attr:price},{attr:special_price})
min({attr:price},0)
max({attr:price},100)
max({attr:price},{attr:special_price})
If product price is 10.00 and special price is 8.00, then above formulas would output:
min(10.00,8.00) = 8.00
min(10.00,0) = 0
max(10.00,100) = 100
max(10.00,8) = 10.00
Rules Builder
Rules builder is one of our key features to make large data catalog manageable. It is used in multiple Wise2Sync components like:
- Product filtering in Export profiles
- Setting values for custom dynamic attributes
- Configuring product price markups
Attributes
Filtering functionality allows product selection based on various conditions, such as:
- Supplier
- Category
- Quantity (stock)
- Price
- Manufacturer
- Description
- EAN
- Product name
- Part number
Basically you can use any mapped attribute or dynamic custom attribute for product filtering. Any possible combination of conditions is possible:

Example above shows some possible combinations. “Delivery Time” – is a custom conditional attribute (read more about this type of attributes in this section).
You can split conditions into groups and set how conditions should be compared: with AND or OR operator.
Operators
Available operators for number type attribute values:
- Equal
- Not equal
- Less
- Less or equal
- Greater
- Greater or equal
- Is shorter than
- Is longer than
Operators for text type attribute values:
- Equal
- Not equal
- Is empty
- Is not empty
- Begins with
- Ends with
- Contains
- Contains only numbers
- Does not contain
Operators for filtering on system attributes, where multiple values are available (f.e. manufacturers, categories, suppliers):
- Equal
- Not equal
- In
- Not in
- Is empty
- Is not empty
- Begins with
- Ends with
- Contains
- Contains only numbers
- Does not contain
Pay attention to any warnings, as it will show you how to optimize your filtering. For example, if you want to add products from several categories use "in" to include all you need and not multiple "equal" filters. Here is an example with an incorrect configuration: 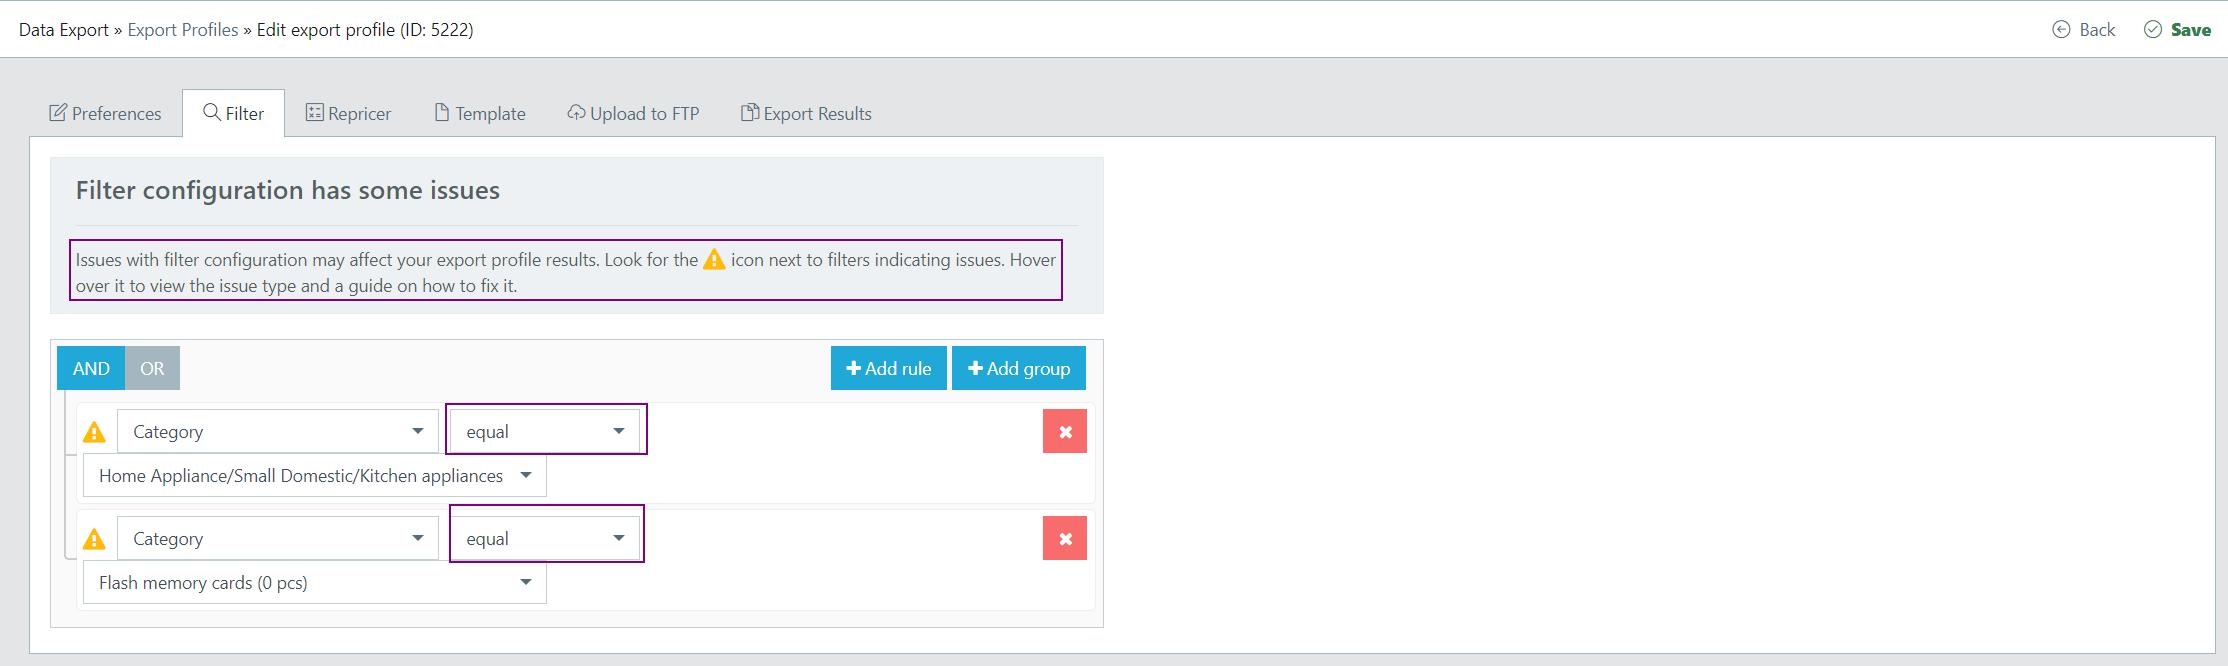
Export profiles
This is where you set which products and how they are exported to your sales channel.
Export Profiles List

Mode
Indicates, weather the export profile is executed manually or automatically. Based on your subscription plan with us, AUTO export profiles will be executed multiple times a day.
- Auto Mode. Amount of automatic export profiles depends on your subscription plan with us. This export profile is executed automatically multiple times a day: we download and sync data with suppliers your suppliers and then automatically generate an export file
- Manual Mode. You can have multiple export profiles with manual mode. These export profiles are not executed automatically - you can schedule it for execution by adding it to Queue (first icon in Actions list). Manual export profiles are useful for testing or when you need to export some sample data of your products catalog. Running manual mode export profiles does not sync data with suppliers.
Type
Shows the type of the export profile (usually a name of your sales channel).
Label
Name of the export profile. You can give your own export profile name and use it for your reference.
Updated At
Date and time when last time the export profile was modified. For example if you modify filters in your export profile and click "Save" - this will be the timestamp of your action.
Completed At
Date and time when the export profile was executed and export file was generated (see Export Results tab in your export profile). In other words, date and time when Export profile status was last set to "Completed".
Status
Indicates current status of the export profile. Possible statuses are:
- Completed - last profile execution was completed successfully;
- Pending - export profile is in queue to be executed. Usually within 1-15 minutes it is picked and it's status is changed to "Running". Sometimes you will see explanation mark with "Related tasks are not finished yet" - this means that product sync with suppliers is still in progress;
- Running - means that our system is working to generate an export file;
- Expired - means that we had problems downloading product information from supplier. Our app will retry to complete this action multiple times during the day;
- Error - indicates that something went wrong and export file can not be generated. Our app will try to execute product export multiple times - if status "Error" remains in your account for a longer period - please notify our support team about the status.
Actions
- Queue - add export profile to queue to be executed. This is useful when you make changes to f.e. product filters, repricing etc. and do not want to wait for the next Auto sync. Once you click "Queue" - export profile status will change to "Pending", then to "Running" and at the end back to "Complete". Your latest product export file will be available "Export Results" tab;
- Edit - enters profile editing screen;
- Copy - copies selected export profile with all preferences and changes the label to "Copy of [original export profile label]";
- Delete - deletes selected export profile.
Creating a New Export Profile
In Wise2Sync, you can create different export profiles. This is an integration with your e-commerce store. There is a possibility to choose the export profile by selecting the template.
Go to Export Profiles → Add Profile and the pop-up appear:

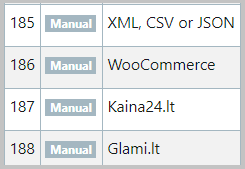
If you are creating a custom integration or just need a CSV file with products, most likely you would choose "XML, CSV or JSON" export template.
For other platforms, like WooCommerce, Shopify, Magento, Ebay - we have made a preset configuration which would create an Export Profile and missing attributes etc.
When in list view, you can also clone the existing export profile for your convenience. Click this icon to make a copy of Export profile:

You can have as many manual export profiles as you want. They are useful when you want to test something or just export a custom products catalog for your own use. When copying profiles, association with repricing rules is not cloned.
General Settings
Preferences
Once you open an export profile you will see the first tab "Preferences". This is where you set some preferences and set how export runs:
- Label - name of the export profile
- Unique Product ID - Wise2Sync will help you select the cheapest product from multiple suppliers. This parameter is used for product grouping. We recommend leaving the default value EAN. In this case, if there are multiple products with the same unique product ID, Wise2Sync will choose the cheapest. For example two suppliers / data sources have the same product with identical EAN code. Then our app will compare these products and export cheaper supplier data.
- Output format - choose your desired output file format. Consult your developer for preferred format for connecting Wise2Sync with your platform.
- Filename - export results will be stored in files and will be accessible in your export profile for a certain time. Use f.e. anything_{date|Y-m-d_H_i_s}, where {date|Y-m-d_H_i_s} will be automatically replaced with current date and time.

Handling deleted products
By default Wise2Sync exports only products, that have been present in suppliers products feeds for the past hour. However, sometimes suppliers remove products from their systems. As a result those products might not be updated on your eCommerce platform. Wise2Sync tracks products history and logs date and time when certain products became missing. Use this setting to include those missing products and override the last known information from the supplier.
For example: include missing products for 3 days after they went missing and set attribute Quantity value to 0.
This feature is available for every Export profile or Integration. Open your export profile and select checkbox "Include deleted products" in "Preferences" tab:

Customizing product Alternatives tag
When Wise2Sync finds that the same product is available with more than one supplier (based on Unique Product ID preference) it will export cheapest in stock product data and add the product alternatives into duplicates_data tag.
By default this tag will contain basic information like supplier code, product SKU, product cost price (as imported from supplier),
quantity etc.
If you wish to add more information to the alternatives, select feature "Use custom template for the Product Alternatives" and add more product attributes.

Product Filter
The export profile tab "Filter" is used to describe which products need to be included in the export profile. You can use it in multiple ways, add filtering for each supplier separately if you have multiple.
You can check our video about this feature: Wise2Sync - Products Filtering
Filtering can be used also for Repricing Rules or Dynamic Attributes therefore we have written a different page section on how to use rules builder.
Export Data Template
If you are exporting an XML, CSV or JSON file, this is where you would form this file and make the structure the way you want. We recommend you configure the template after you have mapped desired attributes, manufacturers categories etc.
Below we give some examples of how to configure XML template. But the same concepts and methods apply for generating JSON or CSV files.

You can use mouse to drag and order elements, as well as moving them to groups. Example template above will output an XML document with the structure as follows:
<item>
	<sku><![CDATA[011629]]></sku>
	<name><![CDATA[D-Link DVG-6004S Voice Gateway with 4 Port FXO]]></name>
	<ean><![CDATA[790069409981]]></ean>
	<price>191.8555</price>
	<stock>0</stock>
	<media_gallery>
		<item>
			<filename><![CDATA[wSsykjQZgZEH.jpg]]></filename>
			<added_at><![CDATA[2019-07-08 14:31:05]]></added_at>
		</item>
	</media_gallery>
	<category><![CDATA[Network components / Gateways]]></category>
	<attributes>
		<manufacturer></manufacturer>
		<part_number><![CDATA[DVG-6004S]]></part_number>
		<warranty>24</warranty>
		<weight><![CDATA[1.42 kg]]></weight>
		<supplier><![CDATA[acc]]></supplier>
	</attributes>
</item>
Adding elements
You can add more elements in the template by clicking red "Add Element". A pop-up will open:

Use search function to find desired attribute:
- Attribute - product attribute to be added in the export file
- Custom element/column name - you can override attribute code by giving it a custom name. So in this case, instead on
<weight><![CDATA[1.42 kg]]></weight>it will be<product_weight><![CDATA[1.42 kg]]></product_weight> - Default value - set a default value in case this attribute is empty. Leave this field empty if you do not want to set any default value
If you choose to add a system attribute (f.e. category, manufacturer), there will be a new field "Mapper Value".

Mapper value has two options:
- Code - attribute Code will be in XML file. F.e.
<brand_code><![CDATA[samdung_products]]></brand_code> - Label - attribute Label will be in XML file. F.e.
<brand><![CDATA[Samsung]]></brand>
See category product data mapping section how data mapping works and how to set different attribute codes and labels.
Uploading products to FTP
Use this option if you want to export products data and upload it to your FTP account.
Open your export profile, click on a tab "Upload to FTP". There are few simple parameters:
- FTP server address - URL of your FTP server. Usually something like ftp://myserver.com You can also set port and directory, for example ftp://myserver.com:21/path_to_files
- Username and Password - your FTP account username and password
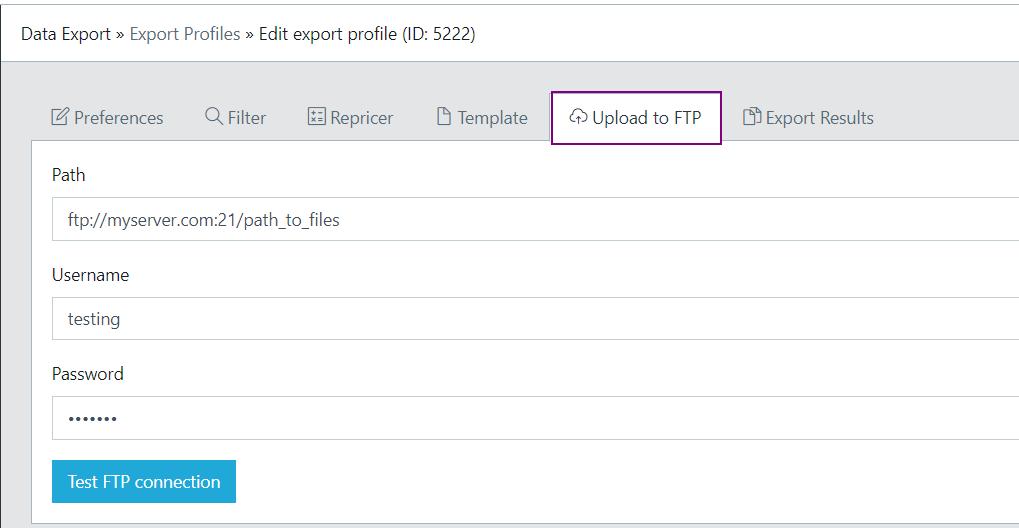
If all is OK, Wise2Sync will upload your products file to your server every time the profile is executed.
Troubleshooting
Test your logins first. You can use our built-in "Test FTP connection" feature to do this. Our system will try to login to the server and create a small file. It will also delete this file. If we had problems doing these actions - it will show an error. If success message is shown - upload to FTP is working.
Make sure your FTP user has write permissions
Our system will not be able to upload files if the specified user does not have permission to write files.
Make sure you have enough space on the server
Wise2Sync will not be able to upload export files to FTP server if there is not enough space. Your hosting provider or server administrator can look it up for you. Missing enough space can lead to only partially uploaded file (for example only 5Mb of 10Mb will be uploaded).
Make sure you do not have IP access limitations
Sometimes FTP server can be configured to allow connections from only fixed IP addresses. If you need IP address of Wise2Sync app - contact our support and we will provide you with the needed information.
Testing logins and permissions manually
You can always connect to your FTP account and check whether you can upload a file yourself manually (use FileZilla or any other preferred FTP client). If you can upload a file and delete it - your logins are OK.
Export results - product log files
When editing an export profile you will see a tab "Export results". No matter if you are using a simple XML export or connection with any marketplace - every time Wise2Sync runs the export profile it generates some kind of file.
You can download and read this file for your own use or for debugging purposes.

Read this article how to download these files with Access token and URL.
Export result files are accessible only for certain amount of time (usually few weeks back).
XSD Schema validation for XML type export profiles
XML validation against XSD schema is useful when you want to make sure the generated XML file is in the right format.
XSD schema validating only with XML and XMLv2 output formats.
Creating a new export profile, select XML, or XMLv2 output format, and mark the checkbox for XSD validation.
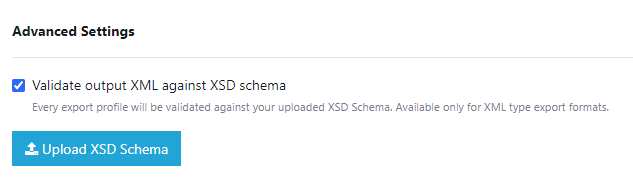
Add new schemas by pressing "Upload SXD Schema". You can add as many files as you need.

All added schemas will be visible across all export profiles. You do not have to upload the same XSD file multiple times.
Setup an export profile and generate it. Validation results will be available in Reports tab.

Left column is a report of errors after validation. Right column - the validated XML file.
How Automated & Manual Exports Work
The daily export means our system collects data from the suppliers, applies all required transformation, and prepares products' catalog in the chosen format to be imported into your e-shop. You can read more about the export profiles here: Export Profile.
Automated Export
This is done automatically multiple times a day depending on your chosen plan (see our available pricing plans). It is also run on fixed hours daily and you are not required to do anything. The green badge "Auto" in profiles list indicates that this export profile is executed automatically.

Manual Export
On-demand export is when the client manually initiates the product export process. Our app will not download product information from suppliers. It will regenerate the product feed with your changes (f.e. new filter, export template, modified pricing rules etc.).
This option is used mainly at the beginning of the e-shop life cycle to import products for testing purposes. It is also handy to use when you want to push an updated product pricing, data mapping, or any changes that you made in your products' catalog.
To generate the manual export file click on the first blue button "Queue" the status will change to "In progress". It takes a few minutes to generate the export file. Once the file is prepared it will change back to the green color "Completed".

You can also see what type of export profile you have in Wise2Sync. In the third column, it indicates whether it is the default one (XML, CSV or JSON) or any other that you may have for example Woocommerce, Shopify and etc.
Dynamic Attributes
Create custom attributes and assign values based on specific conditions. Lets take an example of "Delivery term", which can be variable depending on the supplier. In this article we are creating a Delivery term attribute, which will have text type values:
- 1-3 working days
- 3-5 working days
- 5-10 working days
We recommend you first do the manufacturer, categories and attributes mapping before constructing dynamic attributes. Only mapped attributes will be available for building conditions.
Create Attribute
Go to Data Mapping → Dynamic Attributes, click "Add Attribute" fill in fields and click Create. A pop-up will open:
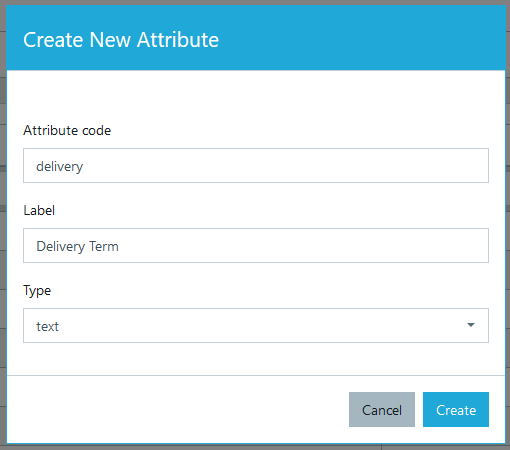
Dynamic Attribute has three parameters:
- Attribute code → unique identifier (ID, code or any other value, that can be used for import in your sales platform).
- Label → usually a text value, friendly name of the Attribute you will see in export profiles.
- Type → choose weather attribute values will be numeric or text.
Click "Create" and your attribute will be saved.
Assign values
After you've created an attribute it is time to assign values. Click on the "Values list" green icon in the corresponding row:

Then click "Add value" in the top right corner. A pop-up will open. Here you can assign value based on preferred conditions. See this article how to use Rules builder.

Example in above picture will work as follows: if product category is one of "..." and Supplier is not "ALSO", then delivery term is "1-3 working days".
Wise2Sync will try to assign delivery term values based on priority. If value is assigned in the first rule than Wise2Sync will not try to apply any other rules.
After you created values for other delivery terms, your values list should look like this:
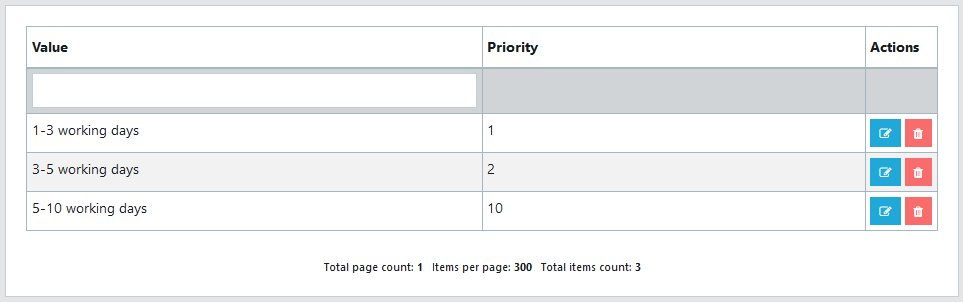
We've left conditions for "5-10 working days" value empty and set the highest priority. This means, that this rule will be applied for all the other products that do not have already assigned delivery term.
Product Export Checker
This feature is useful when you want to check why certain products were (not) exported in a particular export profile.
Navigate to "Product Export Checker" menu item from the left sidebar. You will see a search form. Select:
- Supplier from your list
- Attribute you are going to search for (usually SKU or EAN)
- Choose the export profile from the list

If the product is not getting exported and fails the conditions, the reason will be explained. For example, the product below was not exported as it was last updated by the supplier last month. Meaning that the product is no longer available from the supplier.

Finally, in this example, we can see that the product passed all the conditions and was exported correctly. It also gives the basic information about the product such as the original product price (given by the supplier) and quantity.

Product Data Preview
Shows originally imported products from your data source (your eCommerce platform or supplier). This tool is useful when you want to check what information your suppliers provide.
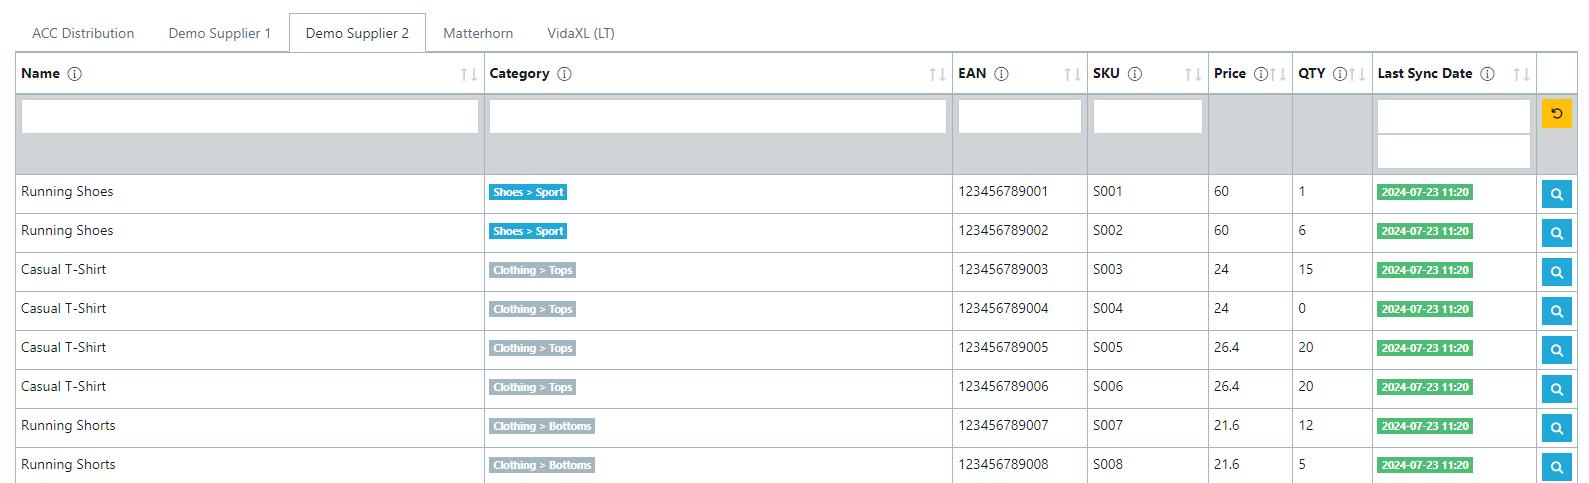
Use search fields to find a specific product. If you click on a "Preview" icon, a pop-up will open:
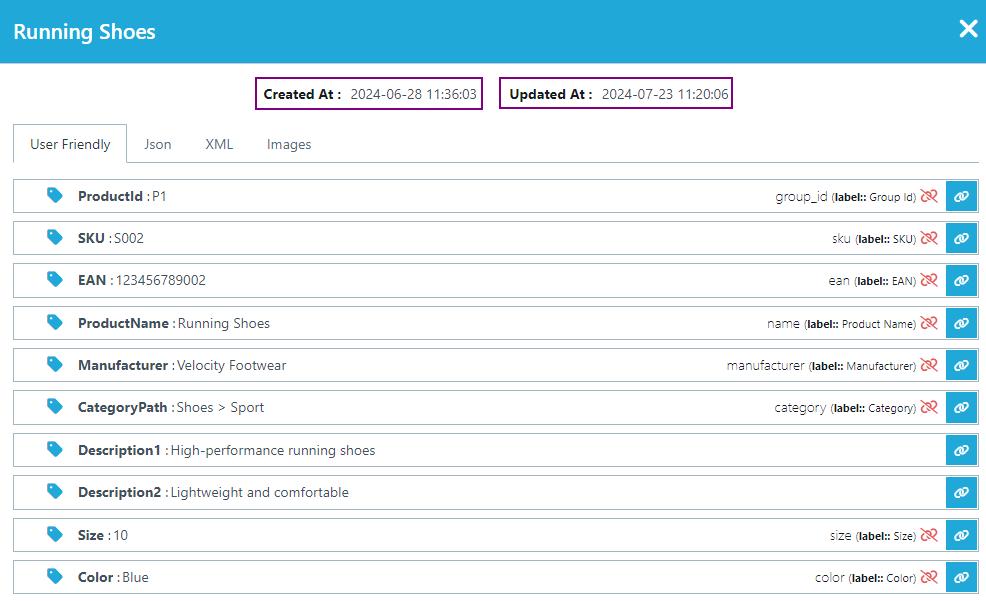
- Created At - shows the date and time when Wise2Sync imported this product for the first time
- Updated At - date and time when last time Wise2Sync synced this product with supplier
Attributes mapping is also available directly in the Product Preview (blue buttons on the right). You can find more information about it here.
You can check all the data we have about this product - it is in "raw" format - the way it is described in the feeds.
Re-index suppliers
Re-index feature is meant to increase the performance of Product Preview:
-
Faster loading.
-
Faster searching.
-
Faster filtering.
This feature indexes the main attributes used in Product Preview:
Product Preview attributes - Name, Category, EAN, SKU, Price, QTY.
After re-mapping these attributes you will get a notification to re-index your suppliers.

You can hover over the icon near the supplier name to get additional info

Then press “Reindex supplier” button on the top right corner

After pressing it you will be asked “Do you want to reindex suppliers?”. Press “Yes” if you are done with attribute mapping and suppliers will be added to queue for re-index.

During this process you will not be able to use product Preview search for suppliers in re-index queue. Re-index is done when all warning icons and statuses are gone and you can use Product Preview without restrictions.