Shopify
We are happy to inform you that our new Shopify app is live! Use our newly created Shopify App for seamless products import and export.
- How to start using Wise2Sync Shopify APP?
- How product import and update via Wise2Sync app works
- Importing product tags
- Shopify import limits
- Staying within product limits in Shopify
How to start using Wise2Sync Shopify APP?
-
Discover or select suppliers and sign contracts with them. Receive access/logins or link to their product information feed*.
-
Install the Wise2Sync Shopify App.
-
After installing the Wise2Sync app from the Shopify App Store, we will automatically create an account for you on app.wise2sync.com, connect it with your Shopify store, and redirect you to it directly.
-
When you are ready to start, press the "Upgrade" button at the top, fill in your billing details, and we will send the first payment.
-
Please send us the logins or links to the suppliers' product feeds.
-
After receiving the necessary data and payment, we will add the product information to your Wise2Sync account.
- The export profile will be created automatically with all mandatory attributes for Shopify. Map product categories as tags, add price markups and make sure all the changes you have made are saved.
-
Inform us when you are ready for the product data import.
-
We will create a periodic product feed data update twice per day, and synchronization will start.
*in case you haven't done this yet.
How product import and update via Wise2Sync app works
After you installed our app and set up Wise2Sync API token, you need to go to your Wise2Sync account to set up Shopify Export profile, filter out products and add price markups.
Go to Export profiles → Add Profile and select Shopify App from the dropdown menu.
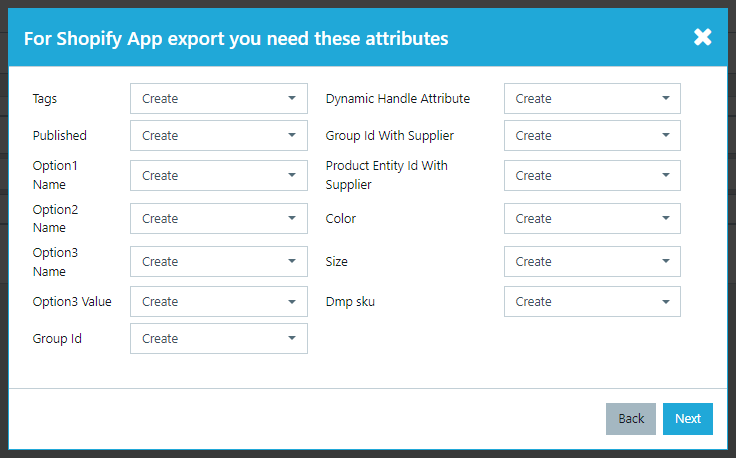

After the required attributes are created you will need to make sure that these attributes are correctly mapped with supplier attributes. Some of them such as handle and product_id, are mandatory but you will need to map only group ID for them if products have such. For products with variations, color or size attributes are mandatory also all product variations must have the same type of options. Product title is a mandatory field also and can not be left empty. If suppliers do not provide images such products will not be imported also.
If one of the mandatory product fields is empty, these products will not be included in the export file.
Use the filters section in the export profile to import only the products you need in your shop. If the supplier provides several categories for the products only the first one will be imported.
Please check more information about product filtering and repricing rules as it is the most important thing when you are setting up your import to Shopify.
After you are sure you are done with the export profile setup contact us through support@wise2sync.com and we will make this export auto, every time a new file is created import to Shopify will start. Be aware of that before you press the Queue button in the Export Profiles menu.
After the product is created, we update only these values in Shopify:
-
Product stock
-
Product price
-
Compare at price
-
Cost per item
Be aware that changes in your store inventory management can cause issues with stock updates later. For example, if you delete the initial location and create a new one after the product import is done stock will not be updated as our APP will look for the deleted location. Please inform us about these changes through support@wise2sync.com
Importing product tags
Shopify is a powerful platform, which has the possibility to generate Collections (categories) dynamically based on tags. Wise2Sync app imports Tags and then uses Shopify features to assign products to collections.
Let's say, the supplier provides detailed product categories which hold valuable information. An illustrative example (this is Matterhorn Wholesale categories) would look like this: if the product belongs to a category "/MEN/Men`s Underwear/Bathrobes & Pyjamas for Men", then assign products with these tags: "Bathrobes, Pyjamas, Men".
|
Supplier Category |
Comma separated Tags |
|
/MEN/Men`s Clothing/Sweatshirts, Sweaters & Jumpers for Men/Cardigans, Pullovers, Turtlenecks for Men |
Cardigans, Pullovers, Turtlenecks, Men |
|
/MEN/Men`s Underwear/Bathrobes & Pyjamas for Men |
Bathrobes, Pyjamas, Men |
Follow the instructions below on how to achieve this.
Step 1. Create Categories

The label field is where you enter the tags. It is important, that tags are comma separated.
You can put anything in ID field - or the same as in the Label field.
When a product belongs to more than one category - we will use the priority field to select the most detailed category. So for example, if you have the category "Clothing" (which is generic), give it a priority -10. And for very detailed categories, give something higher than -10 (in the picture above - we use 10).
Step 2. Map categories

Repeat Steps 1 & 2 for all the categories you want to map.
More in-depth explanation of how to map your categories in this article.
You can also create Tags by editing certain Dynamic Attribute.
Below you can find the three steps, on how to manage your Wise2Sync Export profile for importing tags. Check step three carefully because you will need to use different attributes depending on which way you created Tags.
1. Editing Dynamic Attribute.
After you created Shopify app Export profile Dynamic Attribute “Tags” will be created automatically. You will find the Tag attribute in Attribute mapping → Dynamic attributes list. More information about Dynamic Attribute here.
2. Assign tags/values

You can also assign more tags by separating them with a comma. Use more values and conditions to create as many tags as you want.

3. Check your Export profile
Before we can push Tags to Shopify, you need to make sure this data is available in the export template. Navigate to "Export Profiles" and select your Shopify export profile. Open the Template tab. If you see this line in your template, then you don't need to change anything (in case you are using Dynamic attribute for Tags).

In case you converted supplier categories to tags modify the Template window like this:
-
Change the "Attribute" value from "Tags" to "Category" (attribute labels might be different in your account)
-
Set "Mapper value" to "Label"

In both cases click "Save" button in the top right corner to save the changes you've just made.
If you do not want to wait for the next Automatic Sync, use a Queue action from your Export Profiles list to start pushing new products with tags faster.
That is it!
Conclusion
From now on, when products are uploaded to Shopify, they will have Tags you used in category mapping or in Dynamic attribute:

Wise2Sync app for Shopify only assigns tags at the moment it creates new products.
This means that when our app updates existing products, Tags are not changed/updated. You can modify/translate/change/add or remove tags - your changes will not be overwritten.
If you made changes - save your export profile. More information about Export profiles here.
To make sure that tags will be adding products to the right collections on Shopify side make sure that these fields in the Collection tab are filled properly:

That's it - newly uploaded products should have product tags after the next Sync.
Shopify import limits
SKU Limit
Shopify is an eCommerce platform that is easy to get started. However, because it is a SaaS service, it has some limitations which are imposed by the platform.
Limitations impact how many products we can create and update in a certain period of time. You can read more about API limits in this Shopify article.
Limits are less restrictive if you use a "Shopify Plus" plan.
If you are not running on “Shopify Plus” and have more than 50 000 products and variants in your shop, Shopify will allow us to create 1000 new products per day and a maximum of 100 000 stock & price updates per day.
Limitations also mean that you can not upload more than 50 000 simple (no variants) products into your store per day. This is because each simple product is one variant.
How to deal with it?
We recommend selecting products you really want to sell and do not reach 50 000. Quantity is not always quality. However, if you do not have a Shopify Plus plan but you have many products with variants (size/color), our advice is to upload only one or a few categories per day into your store (use the products filter in the export profile). This way you would not reach the 1000 variants upload limit after reaching 50 000 SKUs.
If you have questions regarding product uploads and updates, along with choosing the right supplier and considering this limitation on Shopify’s side, contact our support team here: support@wise2sync.com.
Image Upload Limits
Images uploaded to Shopify can't exceed either of the following limits:
- 20 megapixels
- 20 megabytes
As Wise2Sync does not process (convert or resize) images, there might be some cases when we are not able to upload large files. A possible solution would be to ask a supplier to provide "web-friendly" images with smaller Mb or MP. Products without images or with images exceeding the limits mentioned above will not be imported.
Shopify has limits for product titles such as name, collection title, and variant title. The limit is 255 characters. If you import a name longer than that, then Shopify will cut it off at that maximum.
If one of the price attributes has more than 8 integer characters, this variant will be skipped. For example:
-
12345678.990 - OK
-
123456789.990 - NOT OK
Staying within product limits in Shopify
In this section, we would like to discuss, how to import products into your Shopify account smartly. As you may know, Shopify has some limitations on product import. You can find more information on "Shopify Limitations" here limits. So, you have to think and choose very carefully which products you wish to sell in your e-shop. Importing a few new product categories daily will help you stay within the limits of your maximum amount of SKU’s.
We are hoping these simple steps will help you to manage your e-shop independently and without major obstacles.
Step 1. Adding filters in the export file
Go to Wise2Sync → Export profile→ open the menu →go to the filters tab. Open the “Filter” tab and choose which categories of goods you want to import. You can add certain manufacturers, the range of the price, or other filters to narrow down the results. Once the filters are set, hit the “Save” button in the top right corner.
For more information about filtering check this article.

Step 2. Synchronizing the products
To initiate your product Sync process manually please click the very first “Queue” button in your export profiles list. The indicator will show that your export file is being processed. Once your file is generated it will show as “Completed”. Otherwise, new products will be pushed automatically when the scheduled profile execution starts.
.png)
Your newly added products will start appearing in Shopify store within a few minutes.
Wise2Sync team hopes that you found this article helpful and if you require any further assistance please do not hesitate to contact us at support@wise2sync.com.